Real Air Fryer Falafel
Golden brown and crispy on the outside, bright green and airy on the inside. Made from raw chickpeas exactly as it should be — never from a can.
Jump to Recipe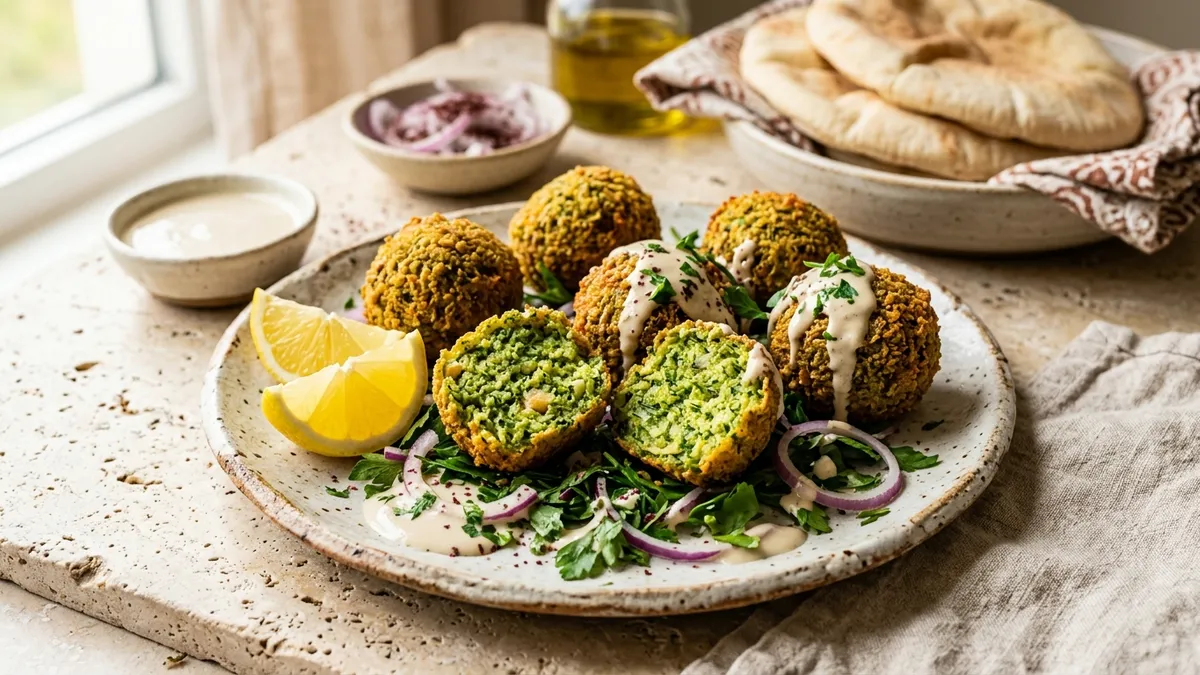
🧂Ingredientsfor 3-4 persons (15-18 balls)
- Dried chickpeas↳ Substitute: NEVER canned!250g
- Small onion1 piece
- Garlic4-5 cloves
- Fresh flat-leaf parsley30g (large bunch)
- Fresh cilantro20g (bunch)
- Ground cumin1.5 tsp
- Ground coriander seed1 tsp
- Cayenne pepper½ tsp
- Baking soda (sodium bicarbonate)½ tsp
- Sesame seeds1 tbsp
- Sea salt1.5 tsp
We need to talk about the biggest falafel lie the internet is trying to sell you. You’ve probably seen it before: recipes claiming you can make “quick” falafel with a can of chickpeas from the supermarket. Let me burst that bubble immediately. That is not falafel. That is baked hummus. If you have ever stood in the kitchen, frustrated because your falafel balls crumbled into pieces in the pan or turned into a sad, mushy puree, the can was entirely to blame. Not you.
Real falafel – the falafel you buy on the street in the Middle East, boasting that perfect, golden-brown, crispy crust and an airy, bright green interior – is always made from dried, soaked chickpeas. Zero exceptions. This is the hill we will die on. And because we all have an air fryer sitting on our kitchen counter these days (hello, convenience!), we are going to merge that authentic technique with the magic of modern hot air. The result? Brilliant falafel, but without the lingering smell of deep-fryer grease in your living room. Let’s dive right in.
The Great Chickpea Myth: Why Cans Are Forbidden
Why do we make such a massive fuss about canned chickpeas? It all comes down to food science and structural integrity. Chickpeas in a can or jar are already fully cooked. The starch in the pea has already gelatinized. They are soft, wet, and ready to eat. That is fantastic if you want to blitz up a velvety hummus or throw them through a salad.
But falafel operates on a totally different level. For real falafel, you soak raw, dried chickpeas in cold water for 18 to 24 hours. They gorge themselves on water, double in size, but fundamentally remain unheated. When you grind these unheated, soaked chickpeas in a food processor (grind, not puree!), you get a texture resembling coarse, wet sand or couscous. The raw proteins and starches act as the perfect natural glue. You press them together, they hold their shape flawlessly, and then the magic happens: the actual cooking takes place in the hot oil or, in our case, the blazing air fryer. During that baking process, the falafel cooks through, the inside steams up and becomes airy, and the outside forms that signature super-crispy shell.
If you use cooked canned chickpeas, you already have a soft puree with zero structural integrity. If you try to form balls out of that and bake them, they simply disintegrate the second the heat hits them. Moreover, the inside will be mushy instead of light and crumbly. So, walk right past the canned vegetable aisle, head over to the dried legumes (or even better, hit up your local Turkish or Moroccan grocer for the best quality and price) and buy a bag of dried chickpeas. You can also easily find them at Albert Heijn or Jumbo. This is the single rule in this recipe that you absolutely cannot break.
Ingredients That Actually Make a Difference
Authentic falafel is all about the correct ratios of a few incredibly simple ingredients. Besides the dried chickpeas, you need a massive mountain of fresh herbs. And when we say massive, we mean massive. Do not hold back on the fresh flat-leaf parsley and cilantro. This is what gives the falafel that gorgeous, vibrant green color on the inside, and that signature fresh flavor that contrasts so beautifully with the earthy spices.
Speaking of spices: cumin, coriander seed, and a pinch of cayenne pepper for a little kick. Onion and garlic provide the hardcore savory foundation. But the one thing you really cannot forget is the baking soda (sodium bicarbonate). This is absolutely critical for air fryer falafel. Half a teaspoon in your batter reacts during baking, causing the inside to puff up and become extremely light and airy. Without this tiny bit of chemistry, your falafel can end up a bit too compact and heavy, especially since you aren’t deep-frying them in oil.
Finally: olive oil spray. An air fryer bakes with intense hot air. That’s great, but falafel absolutely needs a thin layer of fat on the outside to develop that amazing texture; otherwise, they dry out and end up with a chalky, dull exterior. So, spray away!
Step by Step to the Perfect Air Fryer Falafel
Step 1: The Soaking (The Day Before)
Dump the dried chickpeas into a large bowl and pour in a generous amount of cold water. They are going to roughly double in volume, so make sure they are submerged under at least 5 centimeters of water. Leave them on the counter for 18 to 24 hours. After this time, drain them and rinse them very, very thoroughly. The absolute most important thing after this is drying them. Make sure you pat them as dry as humanly possible with a clean kitchen towel. Excess moisture is the mortal enemy of falafel.
Step 2: The Food Processor
Put the chickpeas, roughly chopped onion, garlic cloves, parsley, fresh cilantro, and all the spices (except the baking soda!) into your food processor. Now it’s time to pulse. Do not just turn the machine ‘on’ and walk away, or you’ll end up with mush. Use the pulse button. Scrape down the sides well in between pulses. Keep pulsing until you achieve a texture that looks exactly like couscous or coarse sand. If you grab a handful of the mixture and squeeze it, it should hold together like a rough dough.
Step 3: Chilling Out
This is the second most important step. The mixture needs to rest! Cover it up and stick it in the fridge for at least an hour. This allows the flavors to meld properly, and the moisture level balances out, which makes forming the patties a hundred times easier later on.
Step 4: Shaping and Baking
Only now do you add the baking soda and sesame seeds to the cold mixture. Stir this in gently but thoroughly. Now we shape. For the air fryer, it is highly important that we do not make perfectly round balls, but slightly flattened discs (patties). This ensures they have vastly more contact with the air fryer basket and the hot air, which directly results in a larger, crunchier surface area.
Preheat your air fryer to 180°C. Spray the basket with a little oil. Place the falafel patties in the basket – make sure there is space between them, and bake in two batches if necessary. Now, spray a generous layer of olive oil directly over the falafels. Don’t be stingy; this layer of fat is the key to success in the air fryer. Bake them for 12 to 15 minutes. Carefully flip them over halfway through (after about 7 minutes) and lightly spray the other side as well. They are done when they boast a deep, golden-brown crust.
Common Mistakes You Need to Avoid
- Over-mixing in the food processor. We’ll say it again: you are not making hummus. If the mixture turns into a paste, the falafel will be tough and dense. Pulsing is the magic word.
- Not drying the chickpeas properly after soaking. If they are too wet, your falafel batter will be way too mushy. Dry them thoroughly!
- Skipping the chilling phase. If you try to bake the mixture straight after grinding, it falls apart much faster. Patience pays off. Give it that hour in the fridge.
- Using zero or too little oil. The air fryer is a wonderful machine, but hot air alone won’t give you crunchy falafel. Without a solid spray of oil, they become dry, mealy, and chalky white. Spraying is essential.
Smart Freezer Tips (Meal Prep Heaven)
Falafel might just be the absolute best thing to make in massive batches and freeze. The beauty of it is that you freeze the raw mixture and you can bake them straight from the freezer. How do you pull that off? Shape your falafel patties and lay them out on a baking sheet or tray (lined with parchment paper) so they don’t touch each other. Chuck this straight into the freezer. Once they are rock hard (after an hour or two), you can transfer them into a freezer bag. This stops them from sticking together in one giant clump. When you want to eat them, place the frozen falafels in the air fryer (don’t forget to spray them with oil!) and bake them at 180°C for 15 to 18 minutes. Way faster than waiting for the delivery guy!
Serving Like a Pro
You have just created the best falafel of your life, so please don’t just throw them dry onto a plate. Eat them the way they are meant to be eaten. Heat up some thick, soft pita breads. Stuff them to the brim with fresh iceberg lettuce, diced tomato, cucumber, and pickled red onion for that bright acidic punch.
The sauce is at least as important as the falafel itself. A classic tahini sauce is mandatory. In a small bowl, whisk 4 tablespoons of good quality tahini (sesame paste) with the juice of half a lemon, a pressed garlic clove, a pinch of salt, and just enough cold water (usually about 3-4 tablespoons) until the whole thing transforms from a stiff paste into a smooth, pourable, creamy sauce. Believe me, you will want to pour this stuff over everything. Want to make things even more exciting? Try giving it a sweet-and-sour Middle Eastern twist by making a chutney with tamarind paste. Not exactly sure what to do with tamarind or how to substitute it if you don’t have it? Check out our guide for tamarind substitute. Its deep, complex acidity cuts fantastically through the earthiness of the falafel.
Frequently Asked Questions (FAQ)
Why do I have to use baking soda? Can I just leave it out? Do not leave it out. Baking soda reacts as soon as the falafel gets hot and creates tiny air bubbles inside the mixture. When deep-frying in oil, the batter expands naturally a bit, but the air fryer heat is significantly drier. The baking soda ensures your falafel doesn’t turn into heavy, massive stones, but remains delightfully airy instead.
My mixture feels way too wet, what do I do? If you didn’t dry the chickpeas properly, or accidentally got too much moisture from the onion, the mixture can become too wet. Don’t panic. Simply add one or two tablespoons of chickpea flour or regular wheat flour to absorb the excess moisture. Then let it firm up well in the fridge for a bit longer.
Can I make this falafel in a regular oven too? Yes, absolutely. The result in the air fryer is slightly crispier due to the rapid air circulation, but the oven works fine. Preheat the oven to 200°C. Place the falafel patties on a baking sheet lined with parchment paper. Spray them generously with oil and bake them for 20 to 25 minutes, carefully flipping them halfway through.
Why am I not allowed to puree the chickpeas? Structure! If you puree chickpeas into a smooth paste, you destroy the little chunks that provide the crunch and the bite. Furthermore, a paste becomes heavy and compact in the heat much faster, or it simply falls apart because it lacks the texture needed to hold everything together. It genuinely needs to look like sand or coarse couscous.
Can I also use dried fava beans (broad beans)? Excellent question! Traditional Egyptian falafel (Ta’ameya) is made exclusively from dried, peeled fava beans. In many Levantine recipes, a 50/50 mix of chickpeas and fava beans is used. It is incredibly delicious and gives the falafel an even greener, lighter structure. The preparation method, including the 24-hour soak, remains exactly the same.
So, throw those cans of chickpeas in the trash (or just save them for hummus), buy a bag of dried peas, plan ahead a little bit, and tonight you will make the best falafel you’ve ever pulled out of your own kitchen. Enjoy!